How to Change Read Only Files on Mac?
It is necessary to set up read only permission for certain files, folders or disks to decline unwanted or unexpected write access. However, that is not the only reason why files suddenly appear unwritable on Mac. It also could result from file system incompatibility or disk corruption. When a file system, such as NTFS, is not fully supported by macOS, macOS won’t allow you to edit the files. If a disk is corrupted, write access is blocked to protect the data on the disk from being overwritten.
We will cover all possible reasons and solutions in this article. If you know the reason for your read-only files, locate the most relevant solutions directly. If not, read through the solutions in sequence.
- Change file permission
To change access permission to a file, a folder or a disk, make sure you know the correct administrator password. You can set up the file permission to Read & Writer, Read Only, Write Only,or No Access depending on your need.
In today’s case, you will need to assign Read & Write permission to a file, a folder or a disk.
Step 1: Right-click a file, a folder or a disk on the desktop or in the Finder and then choose Get Info.
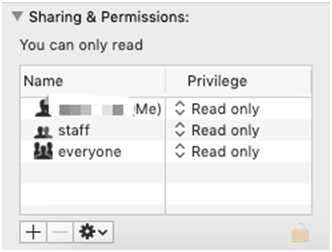
Step 2: Scroll down to find the Sharing & Permissions. If the information is invisible, click the triangle to unfold it.
Step 3: Click on the lock icon at the right corner to unlock it.
Step 4: Enter your administrator password.
Step 5: Find your user or group name under Name and the permission under Privilege.
Step 6: Click the up or down arrow to choose Read & Write from the pop-up menu.
Step 7: Click the lock icon to lock it.
After the privilege setting has been changed from Read only to Read & Write, you should have the write access to the file.
Read More – Universal Clipboard across Apple devices
- Use NTFS drive with full access
Files on a Windows NTFS-formatted disk will be shown read only on a Mac machine. To gain full read and write access to an NTFS drive in macOS, you can format the drive to a file system fully workable on Mac. It is the fastest and easiest way without any cost.
To format an NTFS drive on Mac:
Step 1: Back up the important files first. Even though the disk is read only, you can copy and paste the files out of the NTFS disk.
Step 2: Open Disk Utility application. If you don’t know where an application is on a Mac, use the Command + space bar (Windows key + space bar on a Windows keyboard) to launch Spotlight search to look for it.
Step 3: Select the disk at the left sidebar. If the disk is invisible, click View to choose Show Sidebar and Show All Devices.
Step4: Right-click it and choose Erase. Erase option works as Format in Windows, so it will delete all files.

Step 5: Fill in a name and choose ExFATas Format and GUID Partition Table. The reason why ExFAT is recommended is that this file system supports files larger than 4GB, which is not supported by FAT, and it is compatible with both Windows and macOS.
Step 6: Click Erase on the pop-up window.
If you want to keep the drive NTFS formatted, there are other ways to read and write to NTFS drive on Mac without formatting. For example, enabling the native NTFS write support in macOS with Terminal is an option.
- Repair corrupted external drive
If your external storage device was ejected unsafely, or interrupted by sudden power outrage, the disk may become corrupted due to the corrupted file system or partition table.
To run First Aid:
Step 1: Open Disk Utility application.
Step 2: Right-click the external disk at the left sidebar.

Step 3: Click Run to confirm.
Step 4: Run First Aid twice to get a consistent result if it fails the first time.
If First Aid fails to repair the disk errors, you must have a seriously corrupted disk which can be repaired by First Aid tool. You need to format to get rid of the corrupted file system or partition table. Go back to the second situation to see how to format a disk in Disk Utility.
Conclusion
When a file can only be viewed but cannot be changed, there is something to do with the permission settings, file system incompatibility, or disk corruption. In each situation, the solution is different. Hopefully, this article can solve the read-only files on Mac.